Home
Getting started
Download
|
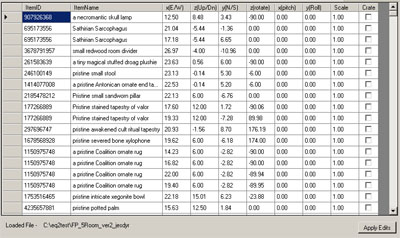 |
First you will need to load a layout by selecting file - > Open and selecting
the file you would like to open. You should now see the contents of the file
listed in the table. You can modify items directly by double clicking on a cell
and typing in a value. You can also select the row by clicking on the grey area
to the left. You can use Shift or CTRL to select multiple lines. Also note that
all fields that accept a value will allow for decimals. EQ2 seems to be limited
to hundreths and so this program will round everything to hundreths for most
displays and when it saves the layout. To save a layout, use Save under the File
menu.
|
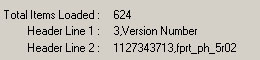 |
Once a layout is loaded the program will display the total number of items in
the file as well as the header information for the file . The hearder info is
not very important aside from the zone name on Header Line 2 (after the comma).
This is the housing zone the layout was created for.
|
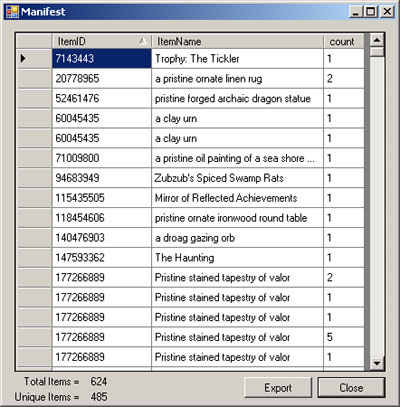 |
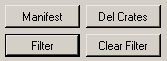
Under the Header information is a set of four buttons shown above. The Top left
button will open the manifest window. This window lets you see the number of
distinct items in the layout and the quantity of each item. It will also let you
export this manifes to a CSV file which most spreadsheet aplications can open.
Next to the manifest button is the "Del Crates" button. This is short for
"Delete crates" and will remove any items that are in the moving crate from the
layout. Currently there seems to be an issue with the Load_layout function in
EverQuest II that causes layouts to only partially load. Removing items in the
crate from the layout seems to fix this issue. Plus there is really no reason to
leave these items in the layout since they are not displayed.
|
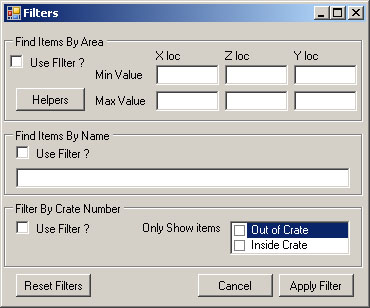 |
Under the manifest button is the Filter button. This will open the filter window
(above) which alows you to filter the main table based on the criteria selected. There
are three types of filters you can use. The "Find Items by Area" filter will
select all items within three dimensional space contain in the points entered.
If you leave a value blank it will not apply that to the filter. This is handy
for selecting a group of objects in an already decorated house. Example would be
if I had a group of items at (x,z,y) (1,1,1) (2,1,2) (3,0,1) and I set the Xmin
value to 1.5 and XMax value to 3.5, then it would filter out the item at
(1,1,1). This feature is easy to use with helper objects which is later in this
document. The "Find Items by Name" filter will filter out any items that do not
match the text entered. You do not need to type the entire name of the item
since this uses a "Like" filter. "Filter by Crate" will filter out items either
in the crate of not in the crate. For any of the filters to be used you will
need to check the box next to "Use Filter?" for that section. You can use all
three at once.
|
On the main page Next to the Filter button is the Clear filter button. This
button will remove the filter set with the filter window and display all the
items in the file.
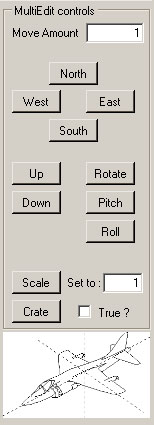 |
The MultiEdit controls to the right of the table alow you to modify the selected
item(s) using this set of buttons. The "move amout" value is the amount it will
move the items. North, South, East and West will change the X and Y values of
the selected item(s).
The Rotate,Pitch and Roll buttons will rotate the item(s) around a given axis.
If you hover your mouse over one of these buttons it will give you a hint on the
airplane about how the item will be rotated. Rotations are always relative to
the object. This means if you rotate an object by 90 degrees around the z axis
(rotate), then the X and Y axis will rotate with it.
The Scale button will set the scale value of the item(s) to the amount to the
right of the button. The Crate button will set the selected items crate value to
the checkbox to it's right. A checked crate value means the item is in the
moving crate ingame. An important note here is that items in the crate will
maintain their position values.
|
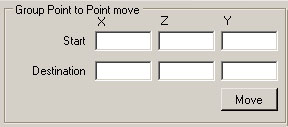 |
The Group Point to Point move section will move the selected item(s) from one
point to another relative to the Start and Destination values. This means that
if you set the start point to 1 meter south of the selected item(s), then set
the destination to a point in another room of a house, the selected item(s)
would move to the other room 1 meter north of the destination point.
|
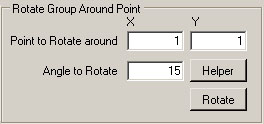 |
The Rotate Group Around Point section will rotate the selected item(s) around
the point entered by the angle set (clockwise). Because this is only rotating on
a 2D plane, you do not need to specify a Z location for the rotate point. You
can set a negative value for angle to rotate counterclockwise.
|
 |
Above the main table are the Save Group and Load Group buttons. The Save Group
button will save the selected item(s) into a group item file. This file can then
be loaded into other layout files even if the other layout file is not the same
housing zone type. The Save group will create a file that is similar in format
to a normal layout file however it modifies the location values of the items so
that they are moved to 0,0,0 which should be a valid location in all house
zones. The Load group button allows you to import these files into the current
layout. You can then use the Group rotation and point to point move functions to
place the imported items to where you want them in the new layout.
|
Under the Tools menu there are three options. The first option is "Merge in".
This will allow you to select a 2nd layout for the same zone to merge into the
currectly loaded layout. The program will automatically delete any items that
are exact duplicates when this fuction is preformed. This can also manually be
done by selecting "Remove duplicates".
The other option under the tools menu is "Helper Items". This feature will most
likely change in future versions of this program. The intent of this is to allow
you to populate various values used in the program with one click by placing
items in the game to use as reference points. For example, if you wanted to use
a filter to select the items that make up a pool table, you could place a single
candle just past one corner of the table on the floor and another single candle
at the oposite corner floated up past the top of the table. then save the layout
in game and load it into the editor. You would then select the row for the
single candle listed in the Helpers window and click "use selected". Now on the
filters window you can click the "helpers" button and it will automatically
populate the values for this filter. You may need to slightly tweak the Min Z
value to include all the items. A single item help is used for the Rotate item
around point. You could place an different item on the ground near the pool
table and use that item to set the "Point to Rotate" around.
|